In September of this year I began homeschool-preschooling my two boys, ages 4 and 2. I’d previously been doing a daily Calendar Time, Learning Board, and Letter-of-the-Week (click the links to find out how I did each) and knew that my oldest was starving for more, more, more! So I purchased a homeschool preschool curriculum, got all the supplies and books, and boom! We started homeschool preschool right after Labor Day.
And boy oh boy, do my boys LOVE doing preschool! We’ve had a lot of fun with it and it’s something they look forward to every day.
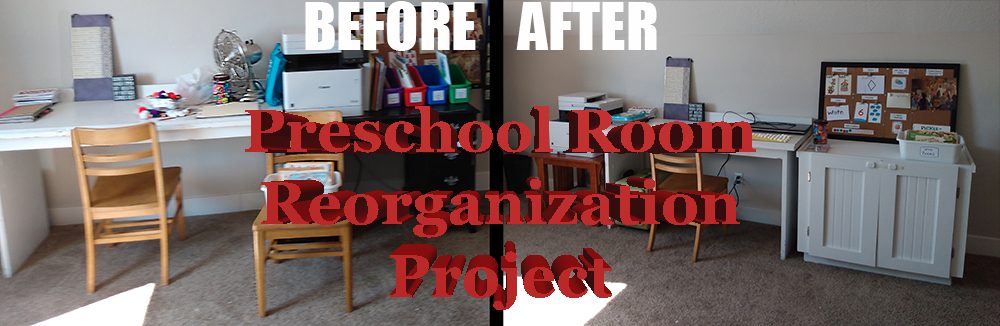
Except I quickly found one glaring issue with the whole thing: our preschool space wasn’t working. I needed a good reorganization, and fast!
Our house has a one-room loft above the garage. It’s a large room, a great space, and we always planned for it to eventually be a playroom. But since our basement isn’t finished, it became sort of the everything-we-plan-for-our-future-basement room: office, craft room, and entertainment room. Oh yeah, and still the playroom. And for the first year-and-a-half of our living in our home, that worked for us.
Then Covid happened. My husband used to work from home occasionally, only once or twice a week. On those days, he took over the loft as his work-from-home office, which was fine because that’s what we planned for and we simply went without our playroom on those occasional days.
And then everything got shut down due to Covid and my husband became a permanent home-from-home guy. I love him working from home (and I really hope he gets to stay permanently working from home after this), but as the months wore on I found myself missing that loft more and more. Not only were we out of our playroom, but we also couldn’t use the TV up there for my boys’ movies days.
As the summer came to a close, I also purchased and planned for this new homeschool preschool curriculum and needed some space for that as well. The loft was ideal because we do our preschool activities during my youngest’s naptime, and so we needed a place a little removed from his bedroom where we wouldn’t wake him up, which ruled out the main family room.
And so together my husband and I decided that he needed a new office space and I needed that loft back. We cleaned out his desks (yes, plural desks–his work takes up a lot of computer screens) and moved them down to our unfinished basement, threw a nice carpet piece on the concrete floor, and voila! A new office for him.
We’ve both really liked him being in the basement. It’s a little quieter down there and more private for work and it’s a lot cooler, he says; all his computers running all day long really heats up the room, and with the loft already being upstairs it really made the room positively stifling during the worst of the summer.
After we relocated his office, I moved all my preschool supplies up there. I used the furniture that was already there, but very soon I realized that it just wasn’t working for my needs. Let me give you a little tour of the room and show you some of the issues:
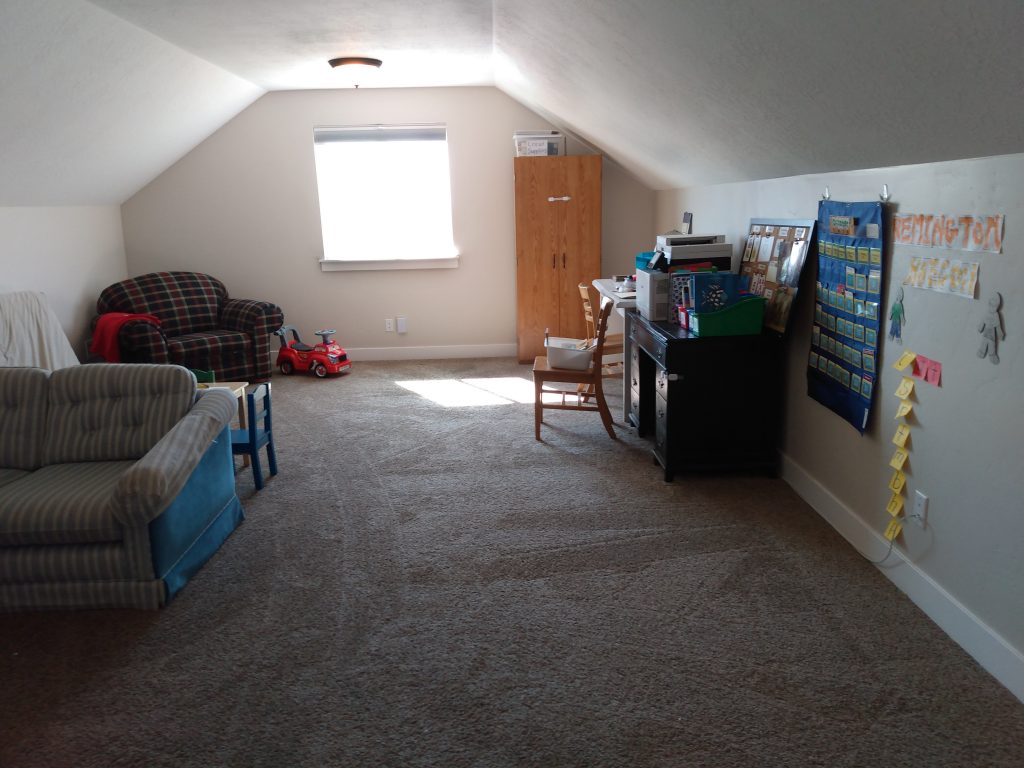
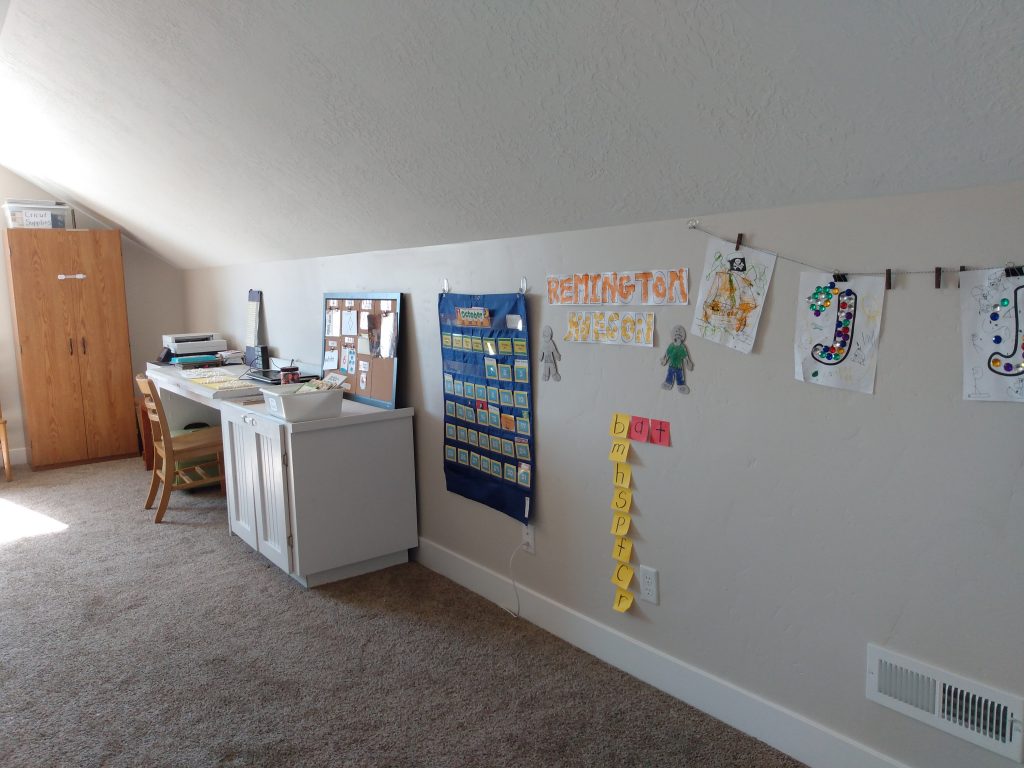
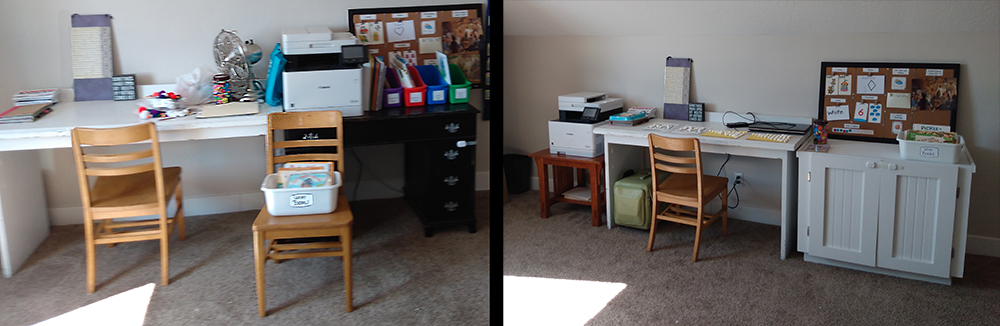
This picture is taken from the doorway. Notice the back/left side is my work area with my scrapbooking cabinet along the back wall, and the right is our TV-watching area.
The white desk is my craft table…at least it’s supposed to be. Obviously it’s been overrun, and we’ll discuss why in a moment.
The black desk used to be one of my husband’s three desks from when he worked up here (I told you his work takes up a lot of space). But he has two larger desks in the basement, so this black one stayed behind. It’s full of office supplies–envelopes, index cards, paperclips, that sort of thing (the second drawer on the right is full of permanent markers, hence the child-lock to keep the kiddos out of it). The most commonly-used drawer is the bottom right that holds my storage box of calendar pieces and learning board cards, which is the only preschool supplies kept in the entire desk.
The top of the desk is also a huge issue. Most notably you’ll see the massive printer taking up a bulk of the space. It’s a new printer, one my husband gifted me to start this homeschooling journey and that has all the bells and whistles on it, a homeschooler’s dream. I was so thrilled to finally have a decent printer…except that it’s so freaking big!
Besides the printer, notice the Learning Board stored on top of it, and the colored containers of books. They are organized and labeled neatly, but take up all the rest of the desk space there except for that sliver of space I use for a few tall binders and books. I have no room for anything else, hence the massive overflow onto my personal craft table.
That overflow is all temporary preschool projects, like artwork with drying glue and used supplies that need to be put away somewhere else. But I simply don’t have room for that kind of stuff anywhere else, and so it all ended up on my own craft table. The left side of the table, notice, is my actual personal crafting stuff and my current projects. But that’s all the space I have; I can’t even do any work there because the preschool stuff is in the way.
Another huge issue you’ll notice here is the chair facing out and sitting in the middle of the room. That white tub there is full of our current unit books. I chose the open tub so my boys could easily peruse it at their pleasure, which they do, but there is no room for that tub at all, hence the chair. It’s a problem.
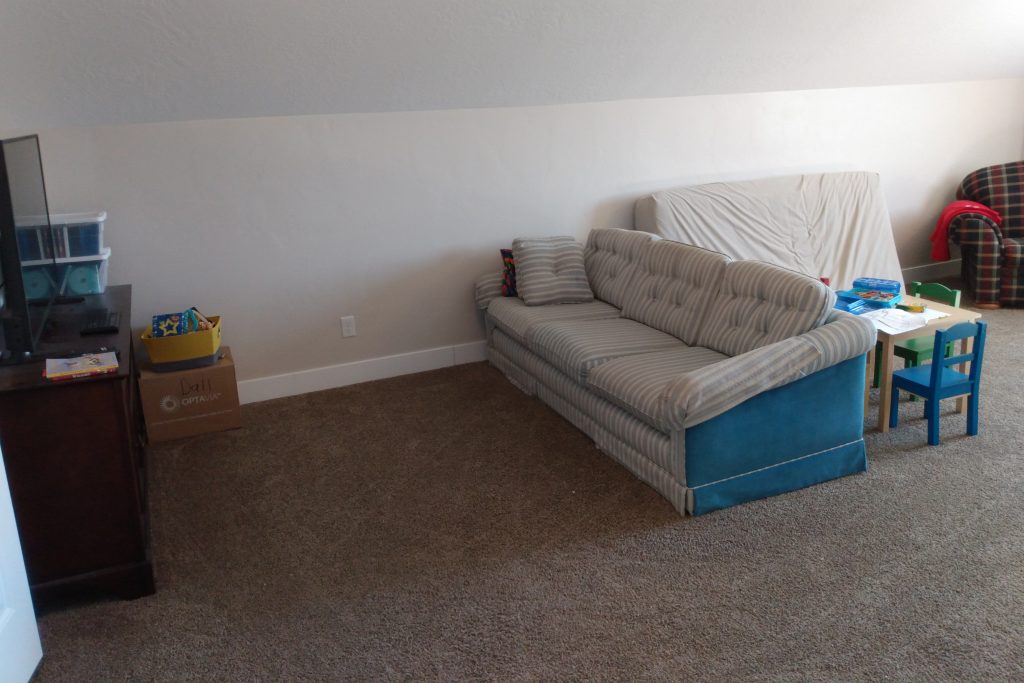
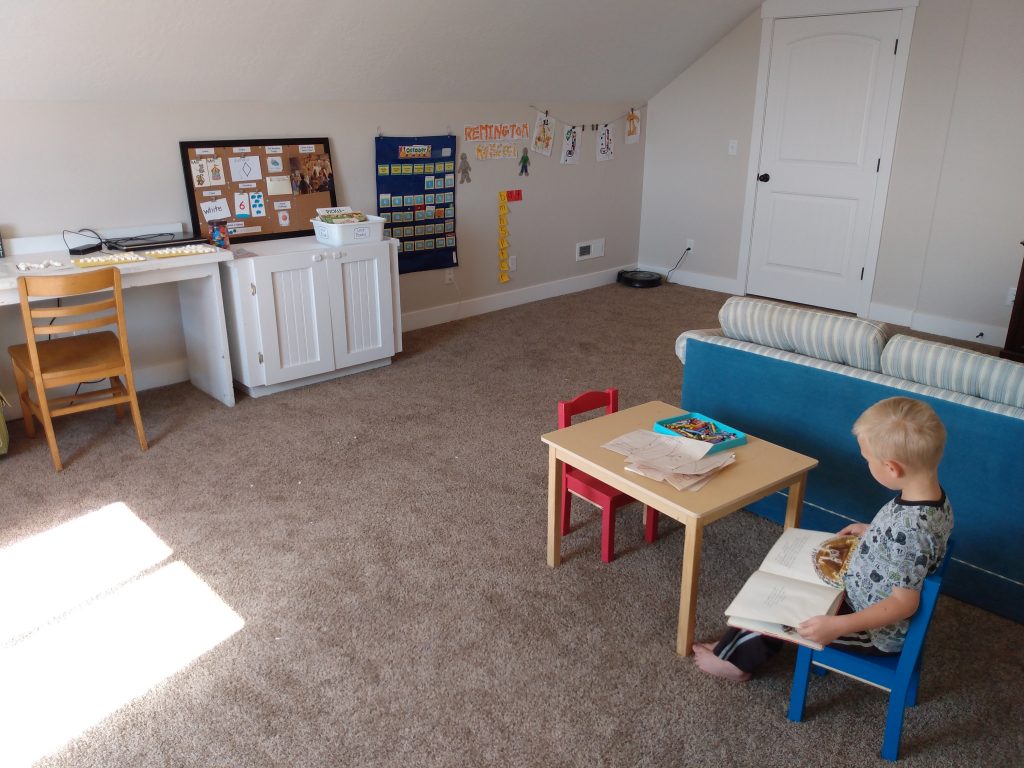
The east side of the room is sectioned off by the couch. The front of the room, closer to the door, is our mini home theater. Behind the couch is the rest of our preschool area, namely the kid table for my boys to work at and the big armchair in the back corner where we sit to read.
(And yes, that’s a spare mattress leaning up against the wall. Once upon a time we used it as a second bed for our oldest whenever he was too disruptive to his brother at bedtime, but thankfully we haven’t had to use it in a long while. Now it just sits up in the loft, ever ready for a difficult bedtime, or more likely used to make a pretend pirate ship or trampoline, both of which I much more prefer.)
It looks simple enough, except here’s the problem: Remember when I said that I said I used all the pre-existing furniture to set up my preschool and that the Calendar/Learning Board box was the only thing in the black desk? The rest of my preschool supplies went into the only other space in the room–the entertainment center.
It’s empty except for a few video game controllers in the far left cabinet. So I loaded it up with my preschool stuff, except that it didn’t fit very well. The shelves inside it are fixed and are obviously meant to hold long, short machines like DVD players, not tall preschool binders. That means that all my books and binders in there have to lay flat, which just makes them harder to see and access.
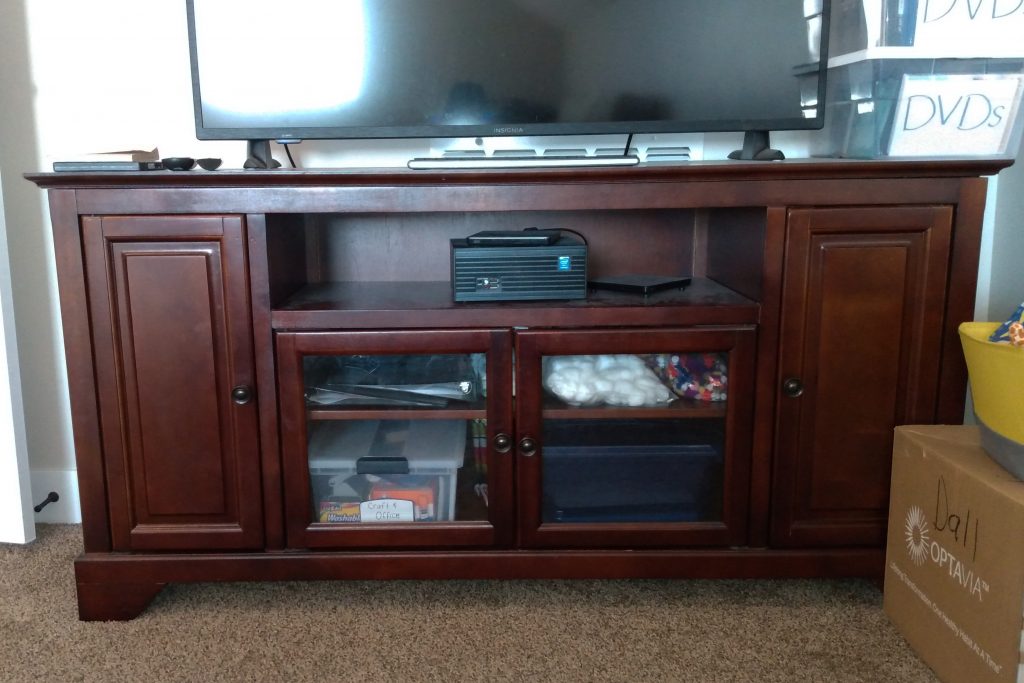
Besides the height issue, the bigger problem is that the whole thing is too far away from our actual preschool area and the kids’ work table.
I realized this problem within the very first week that we started our preschool. We’d all be sitting behind the couch at the kids’ table, preschooling away and having a lovely little time, when I found myself getting up over and over and over to cross the room all the way to the entertainment center to pull out that next thing that we needed, and the next thing, and the next.
It was such a nuisance that I almost immediately found myself leaving all my preschool boxes on the floor beside the kid table…and never bothering to put them away because I knew that I’d just bring them back to the floor the very next day.
That became a huge problem in and of itself. Besides that the room constantly looked messy and cluttered with all my preschool boxes and books stacked on the floor, it became dangerously tempting for my children, especially my youngest.
This was still a playroom as well, remember, and I was used to them being free to play up there with minimal supervision. But too often I’d go up to find that instead of playing with their toys, they’d gotten into my preschool supplies and used the dry erase markers on the furniture, unrolled half the tape, snipped away several feet-worth of string, poured pom-poms all over the floor, left all the markers to dry out without lids on, or poured Elmer’s glue onto the table. Particularly my one-year-old had a problem with getting into my stuff, but my older two boys were far from innocent in this issue; they were usually the ones to leave out the markers for my one-year-old to find, dang it.
I wasn’t happy. No sir, I wasn’t happy.
Even when I buckled down and actually put the boxes away in the faraway entertainment cabinet, notice that the doors are glass. Not only were those very fun and very tempting preschool supplies totally visible to my naughty boys, who learned to open it and get into all that stuff almost immediately, but it just looks cluttered and messy because you can see perfectly clearly all the stuff that’s in there.
Nope. Nope. Nope.
I needed a new system, one that was both accessible and kid proof. And so I went to work. The solution was simple, but it makes a huge difference.
Ta da! My reorganized preschool room!
First, note that the (not pictured) entertainment center is empty again, clean and clear and with no visible temptations through that pretty glass. Thank goodness!
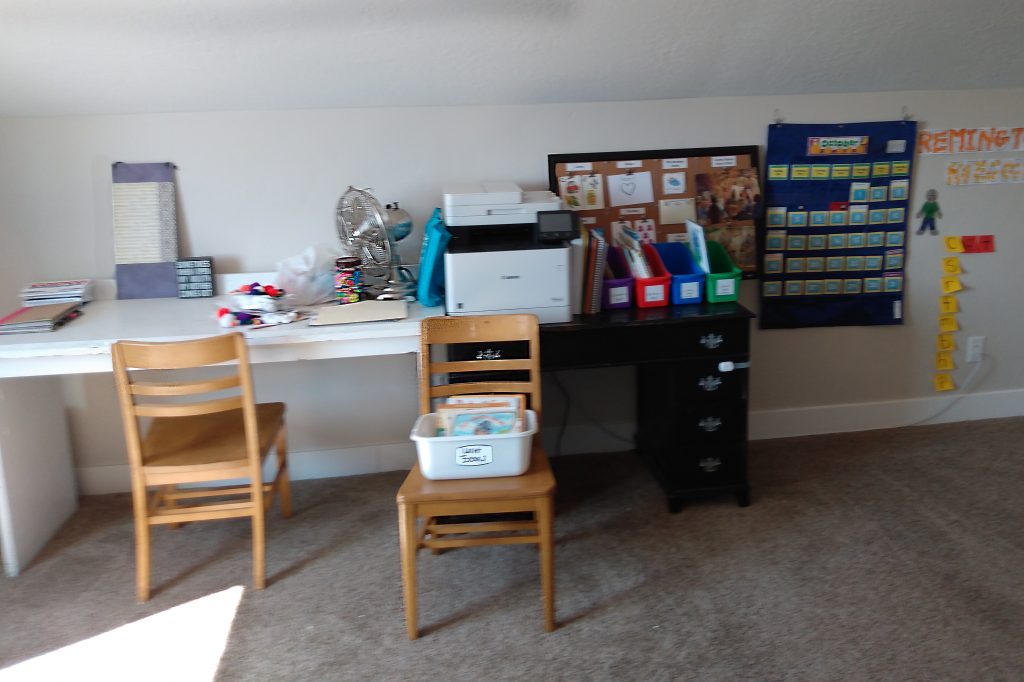
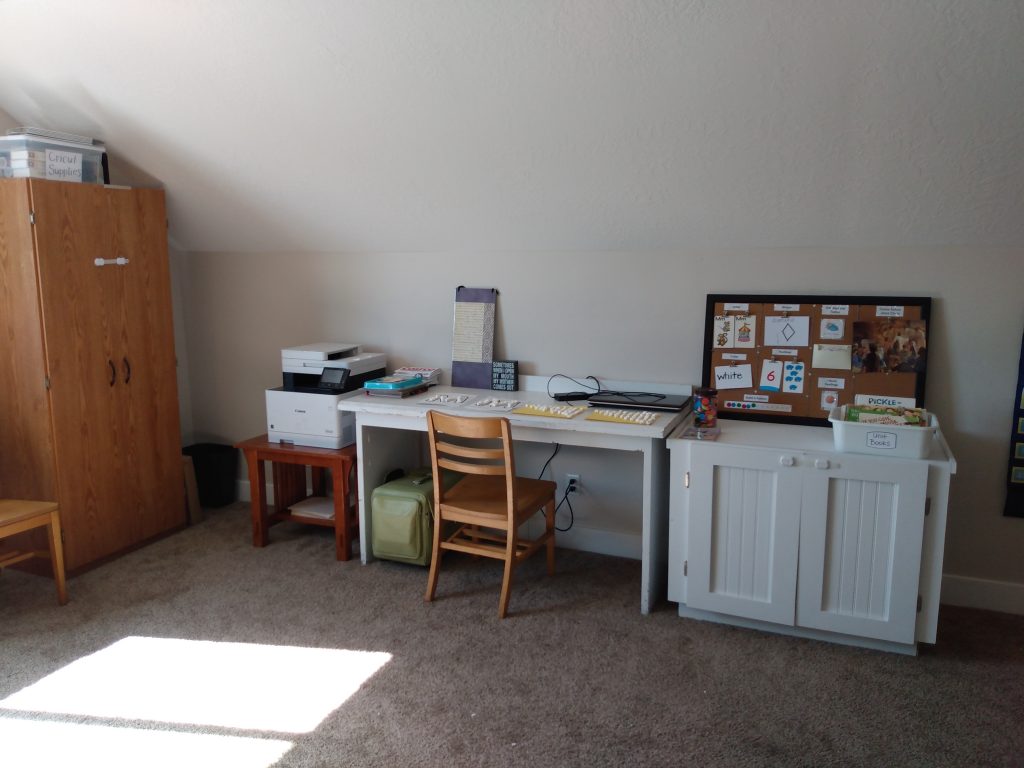
Now take a look at the work wall. My scrapbooking cabinet is still there as is my craft table.
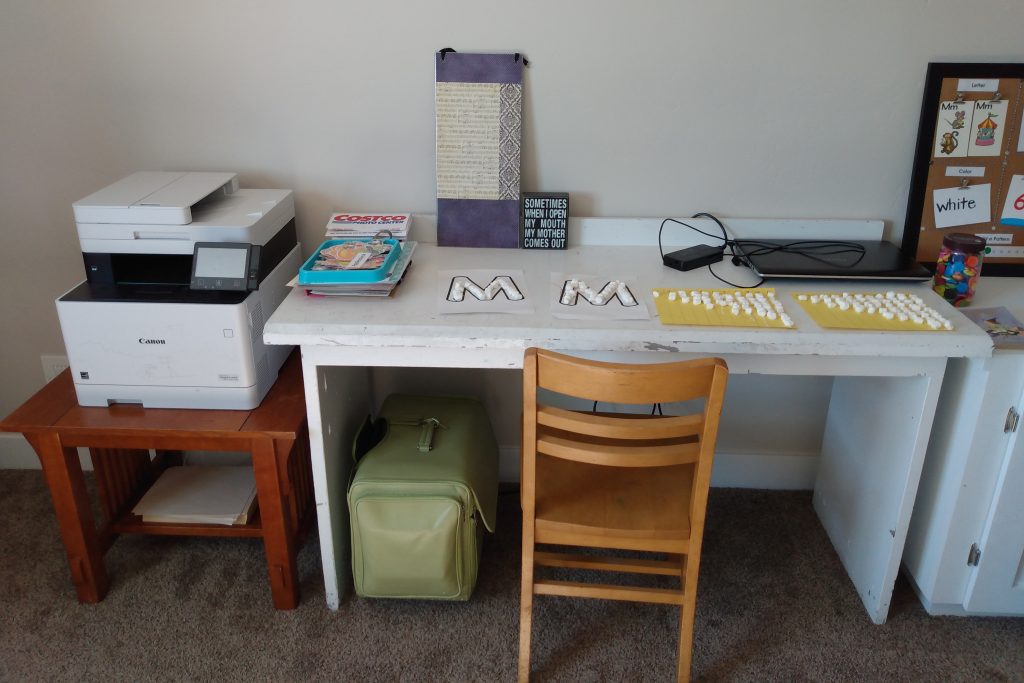
Let’s talk about the printer. We had this spare side table stored in our basement, so I brought it up and put it on the far side of my craft table. I put it here because it hides the printer a little better, having it set lower and behind everything else. Before, that monstrous machine was the very first thing you saw when you entered the room because it was so much bigger than everything else around it. Now it is tucked away and hardly noticeable. Perfect!

Also note that I also used the underneath shelf there store extra paper. My four-year-old is quite the artist and unfortunately learned too quickly how to get paper out of my printer, so I always found myself frustratingly low on paper. Instead, I got him this ultra cheap paper and put it down where he can easily access it. Now he can draw to his heart’s content and use as much paper as he wants…and I can still print stuff.
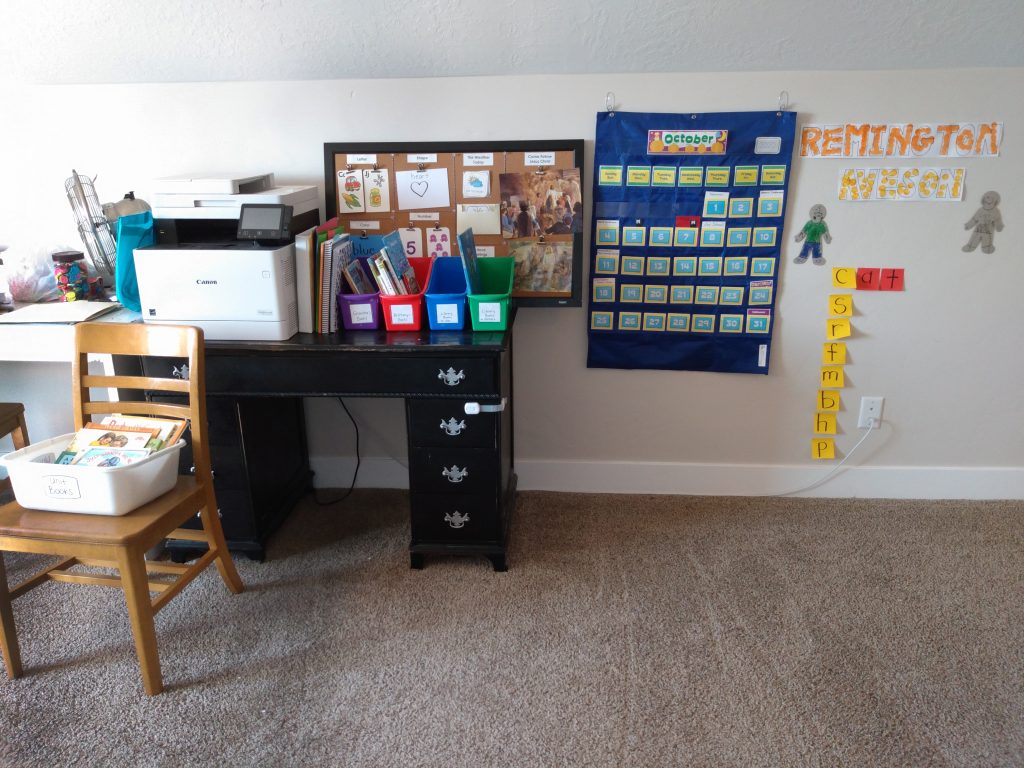
I moved the black desk out, obviously. It went downstairs where I can still access it if I need anything out of its drawers. Instead, I replaced it with this cabinet.
The cabinet was specially made for us and our old house by our nephew with the closed cupboards on the bottom and a bookcase on the top. But ever since we moved, it has remained wrapped up and stored in our basement.
The top part, the bookcase, was too tall for the loft because of our slanting ceilings, but I didn’t need the entire bookcase-worth of storage anyway, so I left the top half in the basement and just used the bottom cabinet.
The bottom cabinet has room for all the things I need: the book organizers, my boxes of supplies, my tall binders, and even the Calendar/Learning Board storage box.
Preschooling tip: keep baby wipes with your school supplies, pictured on the far right of the top shelf. We use wipes all the time to wipe glue off fingers, markers off the table, and paint off of hands. Baby wipes, man! They’re for more than just little bums.
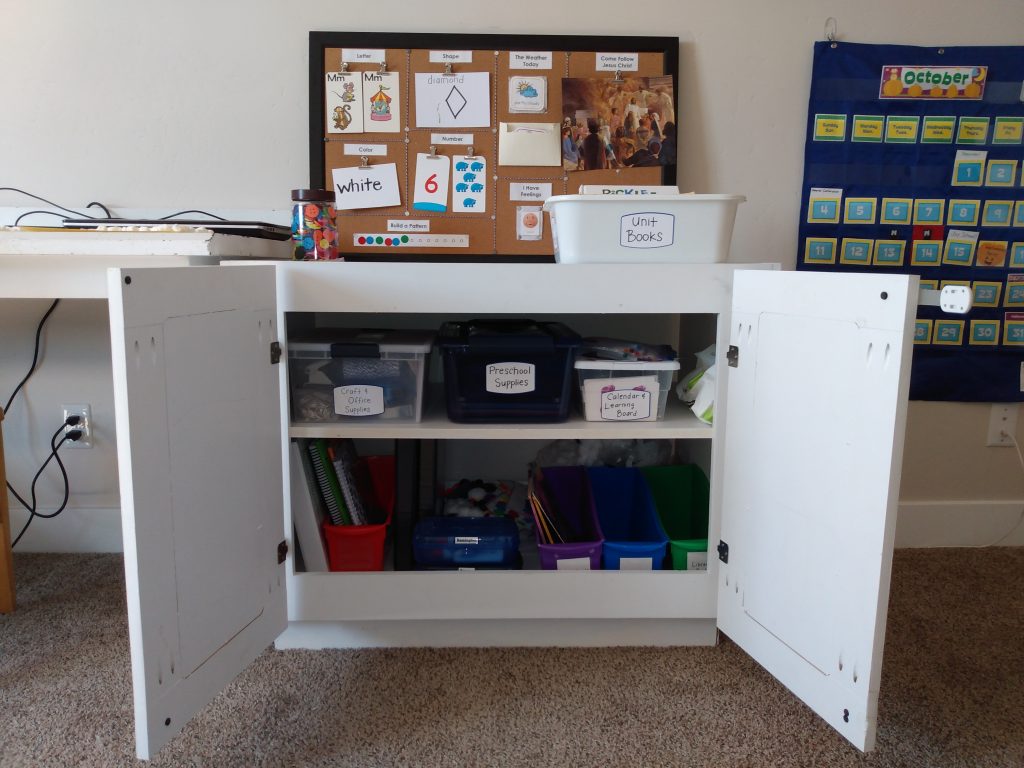
Everything I need is in this one place and it’s all exactly where I need it, right in our work area instead of across the room. And yes, you’ll notice that it also has a child-lock on it: no more markers all over the place for me!
The top of the cabinet is now clear of the printer and so I have much more space. The tub of Unit Books fits there perfectly, instead of on a random chair, with still room for current projects and short-term supplies. And, of course, I can still set our Learning Board up there out of the dangerous reach of my adventurous one-year-old.
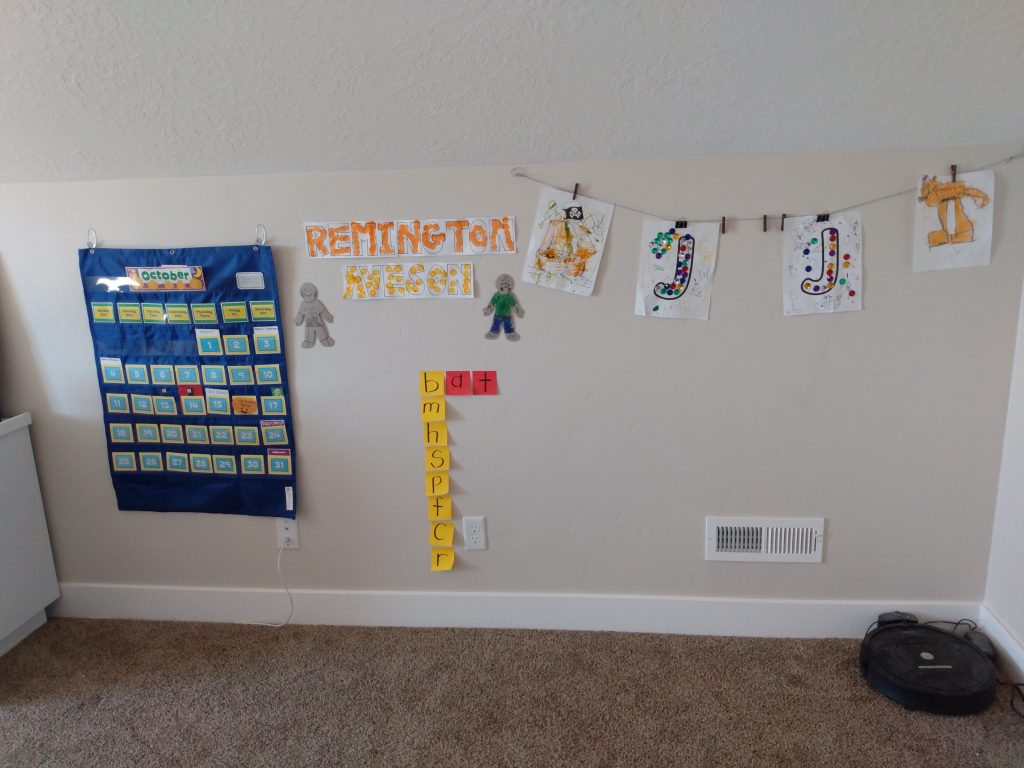
The finishing touch I added was the display wall. Besides our weekly art projects and preschool activities, my boys love coloring pages and drawing, and often want to display their work.
Sometimes I would use blue painters tape to put their artwork up on the wall, but they unfortunately tried that same trick with regular tape and accidentally pulled off some paint. I wasn’t thrilled with that and needed something more kid-usable.
So I used some Command hooks, string, and clothespins instead. Notice that for the heavier pages (the J’s decorated with jewels) that I clipped them up with stronger binder clips, which works great. And my boys are thrilled to put their art up on the wall!
Besides looking cute, this display wall serves another purpose. Remember the overflow onto my craft desk? So much of that was projects that once they dried, had no where to go. And so they just stayed and stayed there.
But now, once a project dries and is finished, it gets off my craft table and up onto this new display wall, and out of my way.
Finally, notice my craft table is totally usable again. Preschool projects are no longer spilling into my space, except when its on purpose, like these marshmallow M’s and counting graphs that are temporarily drying.
I still have my current projects on the left side there, but I also have room, for the first time in months, for my computer! Gasp! I often like to put on music or videos to watch while I work on projects at my table, but I haven’t had room for it in a long, long time. And now I finally do!
Now our loft is usable and preschool-friendly.
Organizational tips and takeaways from this project:
- Use what you have first. I didn’t buy a single new item for this project, not one. The side table and cabinet I already owned. Repurpose other items if necessary.
- Match colors as much as possible. One thing that made the room look extra cluttered was having my white table next to the black desk. It was a necessity at the time, but it always bothered me. Our brains tend to automatically count the items in a space and so I’d look at that work wall and see (besides the stuff on top of both surfaces) two big pieces–one white and one black. Now, the cabinet is white to match the craft table, and so my brain automatically sees it as one large piece, table and cabinet together. It simplifies the big-picture look of the room in a really simple way.
- Keep like-things together. The big issue in this room was that my preschool supplies were spread out, with one box in the black desk, most of it in the entertainment center, and the rest on all the surfaces. Now, everything is in one place. And nothing else goes in this cabinet; this is a preschool cabinet only.
- Everything has a place, even temporary things. Another issue I had was that I didn’t have a designated space for temporary things or to display projects, and so things got piled up where they didn’t belong. Now I have plenty of space to let things dry, to display them, and then to put them in their final place which is my boys’ binders stored in the cabinet.
- Hide things. Remember what I said about our brains automatically counting things? Whenever I looked through the glass cabinets in that entertainment center, I didn’t see one entertainment center, but multiple boxes, bags, and books all crowded in there. It looked cluttered, even though it wasn’t. The only visible things should be currently-used things (such as on-going projects on the table) or decorative items purposely displayed to be viewed. Preschool supplies (or things like tools, dishes, hygiene products, etc. depending on the location) should be stored out of sight. It’s why I like closed cupboards and cabinets, to hide all those items from sight. Glass looks pretty, but it’s not super practical for this principle.